
In our last post, we ported The Collapse to Fire TV using Vega OS. The Amazon Devices Builder Tools for AI saved us from confidently wrong AI-generated code in three or four places.
At the centre of that setup is Turborepo, a monorepo build system that lets packages within a single repo maintain their own dependency trees. We needed that because Vega's SDK is pinned to React Native 0.72, while our mobile app runs 0.81.
Where the TV experience needed to diverge from the mobile experience, we used .kepler.tsx, Vega's platform-specific file extension. Place StorySelect.kepler.tsx next to StorySelect.tsx, and Metro resolves the Vega variant on Fire TV. Same idea as .ios.tsx or .android.tsx extensions.
That got The Collapse up and running on Fire TV.
This post is about what came next.
A one-command script that boots the simulator, a skip button that lets you test the fifth dialogue branch without watching the first four, debugging native crashes, and throwing out our mobile interaction model to rebuild it for a D-pad remote.
We started with the scripts.
Our root package.json was a junk drawer, and what every monorepo looks like after six months. Ours took two weeks. Entropy doesn't wait for your sprint planning.
It had thirteen scripts, most of them subtle variations of dev and build:
{ "scripts": { "dev": "turbo run dev", "dev:mobile": "turbo run dev --filter=@collapse/mobile", "dev:tv": "turbo run dev --filter=@collapse/tv", "dev:ios": "turbo run dev:ios --filter=@collapse/mobile", "dev:android": "turbo run dev:android --filter=@collapse/mobile", "dev:web": "turbo run dev:web --filter=@collapse/mobile", "build": "turbo run build", "build:mobile": "turbo run build --filter=@collapse/mobile", "build:tv": "turbo run build --filter=@collapse/tv", "run:tv": "turbo run run --filter=@collapse/tv", "lint": "turbo run lint", "typecheck": "turbo run typecheck", "clean": "turbo run clean && rm -rf node_modules" } }
It was hard to remember which combination produced "open the Vega Virtual Device, build the TV app, install it, and start Metro alongside."
We rewrote it around verbs that actually describe what they do:
{ "scripts": { "build": "turbo run build", "ios": "pnpm --filter @collapse/mobile ios", "android": "pnpm --filter @collapse/mobile android", "web": "pnpm --filter @collapse/mobile web", "vega:start": "vega virtual-device start", "vega:build": "concurrently --kill-others-on-fail -n bundler,vega -c blue,green \"pnpm --filter @collapse/tv start\" \"pnpm --filter @collapse/tv dev\"" } }
It uses pnpm ios and pnpm android to adhere to Expo's conventions, since expo run:* already starts Metro, installs, and launches in a single process.
For Vega, we deliberately split it into two scripts.
The first, pnpm vega:start, boots the Vega Virtual Device, a long-running foreground process that opens its own window, so you run it once at the start of the day.
The second, pnpm vega:build, builds, installs, and launches the app, bringing Metro up alongside it.
We spent a couple of hours trying to make this into a single command.
The script would auto-spawn the VD (Virtual Device) via osascript (macOS's built-in automation tool), poll until the vega device list reports it as ready, then proceed with the build.
On the happy path, it was beautiful.
Everywhere else, the automation we wrapped around it got brittle fast.
Tying the VD's lifecycle to a Terminal window meant closing the wrong one could terminate it; a process detached from a TTY (a terminal session) didn't reliably surface its window, and polling couldn't always tell "still booting" from "already stopped."
In the end, two scripts (one of which is "set and forget") turned out to be the honest solution.
If the VD isn't running, the vega:build script tells you exactly which command to run and exits after 20 seconds, rather than wasting 60 on a doomed install.
Under the hood, that vega:build script runs two things in parallel: the Metro bundler and a small shell script that does the build, install, and launch sequence.
We use concurrently, a small Node CLI that runs multiple commands with merged output and a shared lifecycle. It fits here because Metro has to be alive throughout the build so the app can pull its JS bundle on launch.
The --kill-others-on-fail flag matters more than it looks. On a clean exit, Metro should stay running for live reload. Only a failure in the dev script should tear everything down. We learned that one by accidentally killing our bundler the moment the install succeeded.
The Collapse is a branching story game.
Each scene can end in multiple ways depending on the player's choices, and those choices branch into further scenes, which then branch again.
In the Studio, it looks like a subway map drawn by someone who kept changing their mind.
Tokyo Metro energy, but with more existential dread.
Halfway through testing one of those branches, our iteration loop had calcified into a ritual.
Rebuild the app, wait for it to install, watch the intro scene, pick the right options to reach the branch we actually wanted to test, then repeat.
So we built a Skip button.
One Pressable that advances through the story graph as fast as the data structure allows, skipping scenes until you reach the branch you care about.
<Pressable onPress={skipScene}> <Text>Skip scene</Text> </Pressable>
That Skip button saved us hours.
It also meant we were now iterating fast enough to find entirely new categories of failure.
Iterate fast enough, and you start surfacing the harder failures.
Not "the JS thread threw an error" crash.
Native abort crash.
The kind where your app disappears, and the OS writes a tombstone file to /SYSTEM_TOMBSTONE/acr, one per crash, pulled with:
vega device copy-logs \ --artifact SYSTEM_TOMBSTONE/acr \ --directory /tmp/vega-logs
The one worth discussing was the native abort in libreact-native-svg-2.so.
Our game has a circular countdown timer on every options screen.
When the player gets a choice, a ring drains clockwise over a set number of seconds.
If it empties before they choose, the game auto-picks for them.
On mobile, we animate this with Reanimated's useAnimatedProps, which lets us update SVG attributes directly on the UI thread without going through React's render cycle.
On Vega, the exact same code crashed.
Here's the tombstone:
6 libreact-native-svg-2.so.2.0 + 0x54930 7 libreact-native-svg-2.so.2.0 + 0x6bc40 8 libreact-native-svg-2.so.2.0 + 0x973a4 9 libkeplerscript-2.so.2 10 libkeplerscript-2.so.2 11 libreact-native-reanimated-2.so.2.0 + 0x53400 … 0 libc.so.6 + 0x81d58 (abort)
Both libraries here are Amazon's own forks: @amazon-devices/react-native-reanimated@~2.0.0+3.5.4 and @amazon-devices/react-native-svg@2.0.x+13.14.0.
Yet the combination of "Reanimated's worklet updating an SVG prop" aborted the process.
The clue is in how React Native delivers prop updates to native components.
There are two completely separate animation systems in React Native that take different paths through the native layer.
Classic Animated API with useNativeDriver: true pre-declares the animation (start, end, duration, easing) and hands it to a native animation driver. The driver runs on the UI thread and pushes prop updates through a validAttributes map registered when the native component was set up.
Reanimated 2/3 worklets are a different beast.
Worklets run on a separate UI thread and write to component props directly via JSI (JavaScript Interface), bypassing the validAttributes entirely.
Looking at the Amazon SVG fork's source confirms which path it was built for. In node_modules/@amazon-devices/react-native-svg/src/fabric/registerNativeComponent.ts:
if (Platform.OS === 'kepler') { register(componentName, { uiViewClassName: componentName, validAttributes: { ...options?.validAttributes, // includes strokeDashoffset }, }); return componentName as unknown as HostComponent<Props>; }
That's registerGeneratedViewConfig, the path React Native's classic Animated targets via the native driver. strokeDashoffset is explicitly in the validAttributes map.
Nothing in the fork's source handles a Reanimated worklet writing to a prop via JSI.
When the worklet does it anyway, the shadow node hits an assertion it can't satisfy, and the native module calls abort().
The app disappears. Like a housemate who owes you rent.
It's not "the fork is broken." It's "the fork was built for the animation system that existed when it was forked”.
Reanimated worklets use a different threading model that wasn't part of its design.
The fix, then, is small.
Just go through the path the fork was built for:
import { Animated, Easing } from 'react-native'; import Svg, { Circle } from '@amazon-devices/react-native-svg'; const AnimatedCircle = Animated.createAnimatedComponent(Circle); const progress = useRef(new Animated.Value(1)).current; useEffect(() => { Animated.timing(progress, { toValue: 0, duration: durationSeconds * 1000, easing: Easing.linear, useNativeDriver: true, }).start(); }, [resetKey, durationSeconds]); const dashOffset = progress.interpolate({ inputRange: [0, 1], outputRange: [circumference, 0], }); <AnimatedCircle strokeDashoffset={dashOffset} ... />
That's it.
The animation runs on the UI thread; the prop updates land in the validAttributes path the fork knows how to handle; and the same code drives the same visual in Vega that Reanimated drives on mobile.
When we hit the tombstone, we pasted the stack trace straight into our agent.
With the Amazon Devices Builder Tools for AI connected, it knew to look up libreact-native-svg-2.so against Vega's SDK, came back with the fork's API surface, and pointed us at the native registration code.
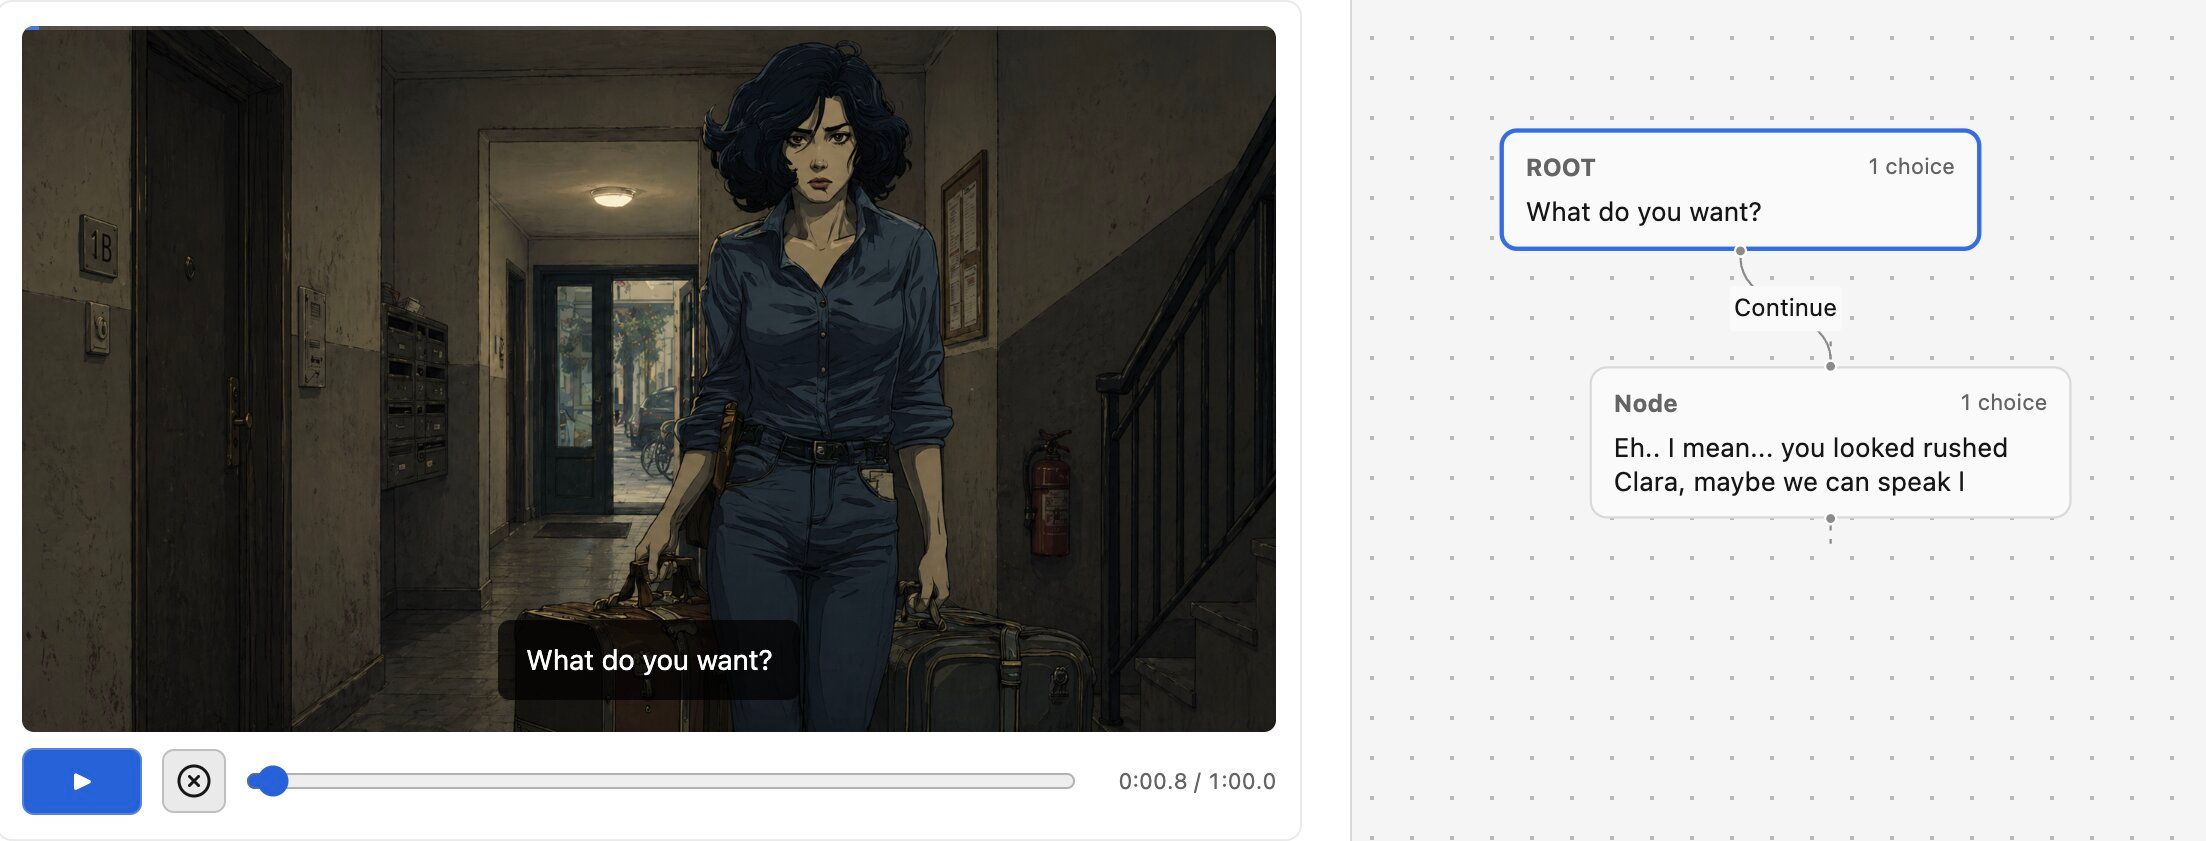
The Collapse presents choices like this: tap an option to highlight it, tap again to confirm.
The first option starts highlighted by default.
It's a pattern borrowed from dialogue wheels in games like Mass Effect or Telltale's The Walking Dead.
On TV with a D-pad remote, that model is wrong.
Press a direction, focus should move. Press OK; the choice should be committed.
Anything else feels broken in a way the user can't quite articulate but will hold against the app forever.
We asked the Amazon Devices Builder Tools for AI for the official focus-management story, and it returned Vega's focus model: Cartesian focus, which treats the layout as a 2D grid.
Press Right, the runtime finds the focusable element nearest to the right and moves focus there. Press Down, and it finds the nearest one below.
The spatial relationship between elements on screen is the navigation order.
Pressable is focusable by default on Vega, so a grid of Pressable components already navigates with the remote out of the box. What we had to write was the bridge between Vega's focus system and our existing game logic, and that ended up being a single platform-specific file.
The result is ChoiceButton.kepler.tsx next to the mobile ChoiceButton.tsx.
Same props from the parent, completely different driver inside.
Mobile reads its highlight from a selected prop the parent flips on tap.
Vega ignores that prop entirely; it listens for onFocus / onBlur and drives the same scale animation and white border off its own focus state.
It mirrors focus back into useChoiceSelection so the timer-expire fallback still knows which option to auto-pick. And onPress confirms immediately, because on a remote, the OK button is the commit; the two-tap dance is a touchscreen idiom.
Same UI, two different worlds underneath.
The Vega focus-management doc was clear about one constraint we'd otherwise have skipped: focus indicators must include a physical change, a border or size, not just colour.
Colour alone fails for colour-blind users and low-contrast TV displays.
So we kept the scale animation and drew the border, instead of trying to be minimal.
The Amazon Devices Builder Tools for AI showed up at every turn: autolink diagnosing when a native module was missing, the focus-management guide for D-pad navigation, the SVG fork's API surface when we needed to confirm that useAnimatedProps wasn't in the supported path.
The TV responds to four buttons, and OK is OK.
Already more decisive than everyone we've dated.
👉 Amazon Devices Builder Tools for AI.
This post was sponsored by Amazon Developer. If you want to see how to actually bring your existing code to their platform, check out Amazon Devices Builder Tools for AI.
