
Since the dawn of time…
The dinosaurs walked the Earth with a…
Wait. Wrong blog post.
That one's for our collaboration with National Geographic.
Let's try again.
Since the dawn of time, Quality Assurance has been the bottleneck of software engineering.
If you didn't know that, do you even software engineer, mate?
Let's get into why.
Why Modern QA Sucks Away Your Will To Live
First, test file maintenance.
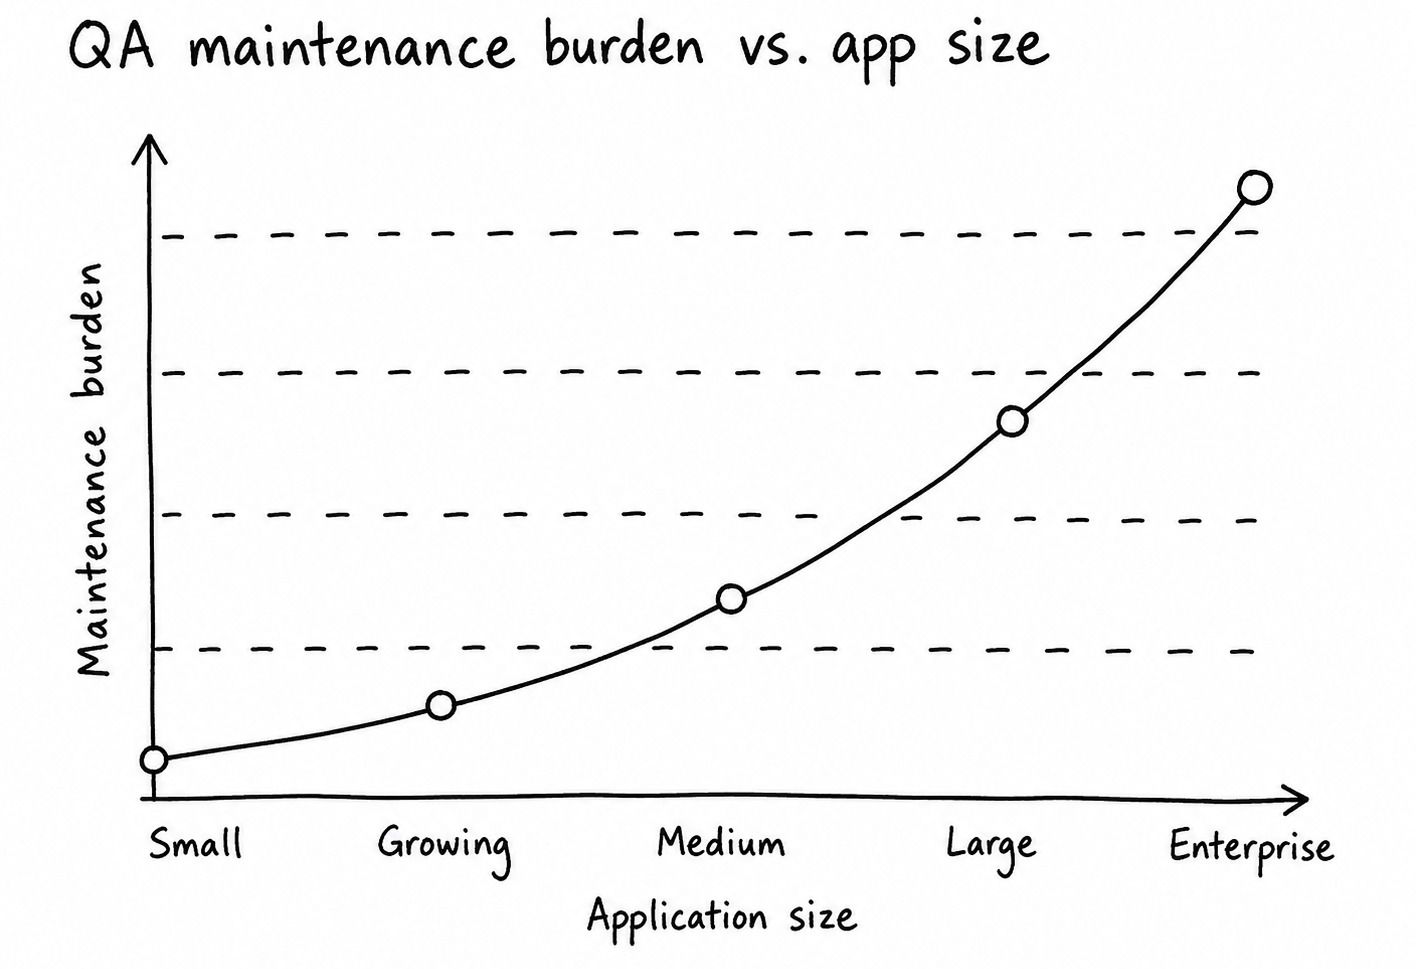
Every feature needs tests, every test needs maintaining, and the bigger your app gets, the heavier that burden grows.
Companies dedicate entire teams to writing and babysitting test suites.
Second, nobody writes tests from the start.
Usually, the app has 80,000 users in production before someone finally says…
"Yeah, maybe we should add some coverage?"
Then you spend four weeks writing tests for every feature you've shipped over the past two years, and now you own a colossal test suite forever.
Good job. Really.
Third, regression tests.
Sounds noble in theory.
Every time you hit a bug, you write a test so that specific bug can never come back.
We've all watched the same defect resurface three times in a single project.
Like a telemarketer who somehow got your new number.
It doesn't make us look good.
But imagine…
(Queues John Lennon piano solo)
Imagine there’s no test suite…
Imagine you could build a system that uses agentic intelligence to dynamically create test flows.
Instead of you figuring out what needs testing and scripting it step by step, you build a system which understands the code changes and builds tests on demand.
A system that covers your fixes, features and regressions without you maintaining a single test file.
That's what we're exploring with Maestro and Maestro MCP.
Maestro, if you've somehow avoided it until now, is an open-source E2E testing framework for mobile and web. You write flows in human-readable YAML, and Maestro uses the device as a real user would.
Maestro MCP acts as the bridge.
Built on Anthropic’s Model Context Protocol, it gives any compatible AI agent (Claude Code, Cursor, Codex) direct programmatic access to your app's UI layer.
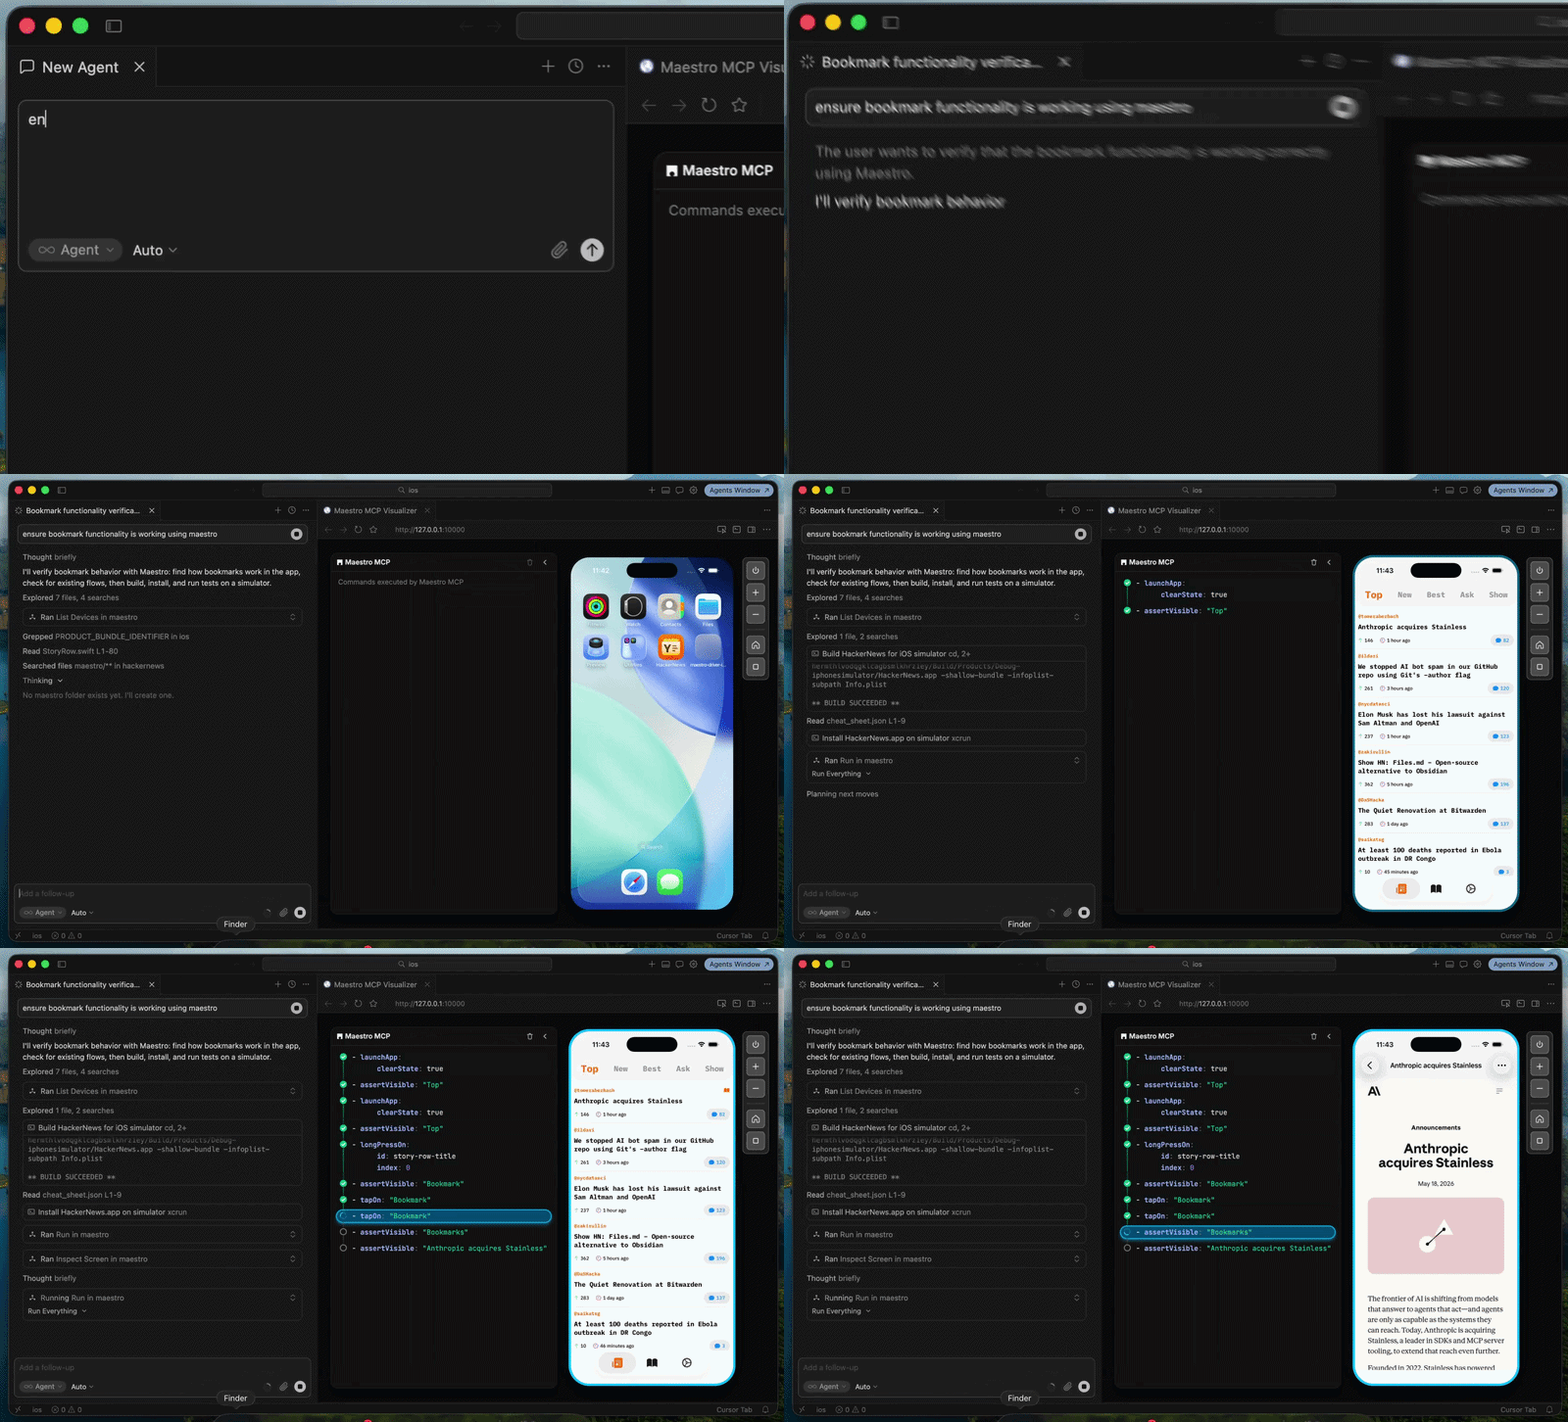
The agent can inspect the live view hierarchy, parse screen elements, and execute actions like taps and swipes to write, run, and debug test flows autonomously.
Designing An Agentic Quality Assurance System
Now… we are not going to show you a bunch of code.
Ew. Code. That is like, so 2021.
These days, we work one level of abstraction higher.
We design systems.
So the answer to the question…
“How do we build an intelligent QA system with Maestro MCP?"
Is not forty code blocks you'll scroll past anyway.
It's picking the technologies, designing the flow, then handing the design to a capable model: Opus, Grok, or Fable (if you got into Dogecoin early).
So what does the system look like?
Every pull request becomes the prompt.
The title tells the agent what you were trying to do. The description tells you why. The diff tells it what actually changed.
That's a better test brief than most humans write in Jira.
And it usually already exists, for free, on every PR.
So we point an agent at it.
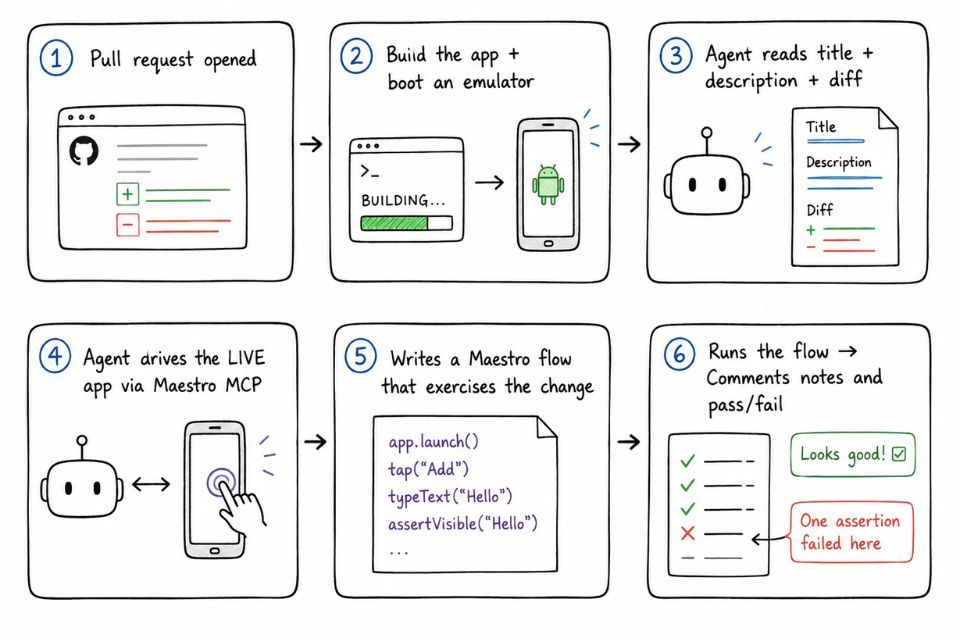
A PR opens.
The CI (Continuous Integration) wakes up.
And we build the app and boot an Android emulator right there on the runner (Android on Linux, because macOS CI minutes cost about the same as a small kidney).
Then we hand a coding agent (Claude Code in our case, but pick your fighter) the PR context and one instruction (the full instruction we hand the agent can be found below).
“Work out the single user-facing thing this changed, and prove it works”.
That's where Maestro MCP comes in.
The agent doesn’t guess what the screen looks like; it actually looks.
It inspects the real view hierarchy, takes screenshots, and taps real elements through the MCP, the same way you would if you were poking at the app yourself. It writes a flow, runs it, watches it fail, looks again, fixes the selector, and re-runs until it's green.
Then it comments the result straight onto the PR.
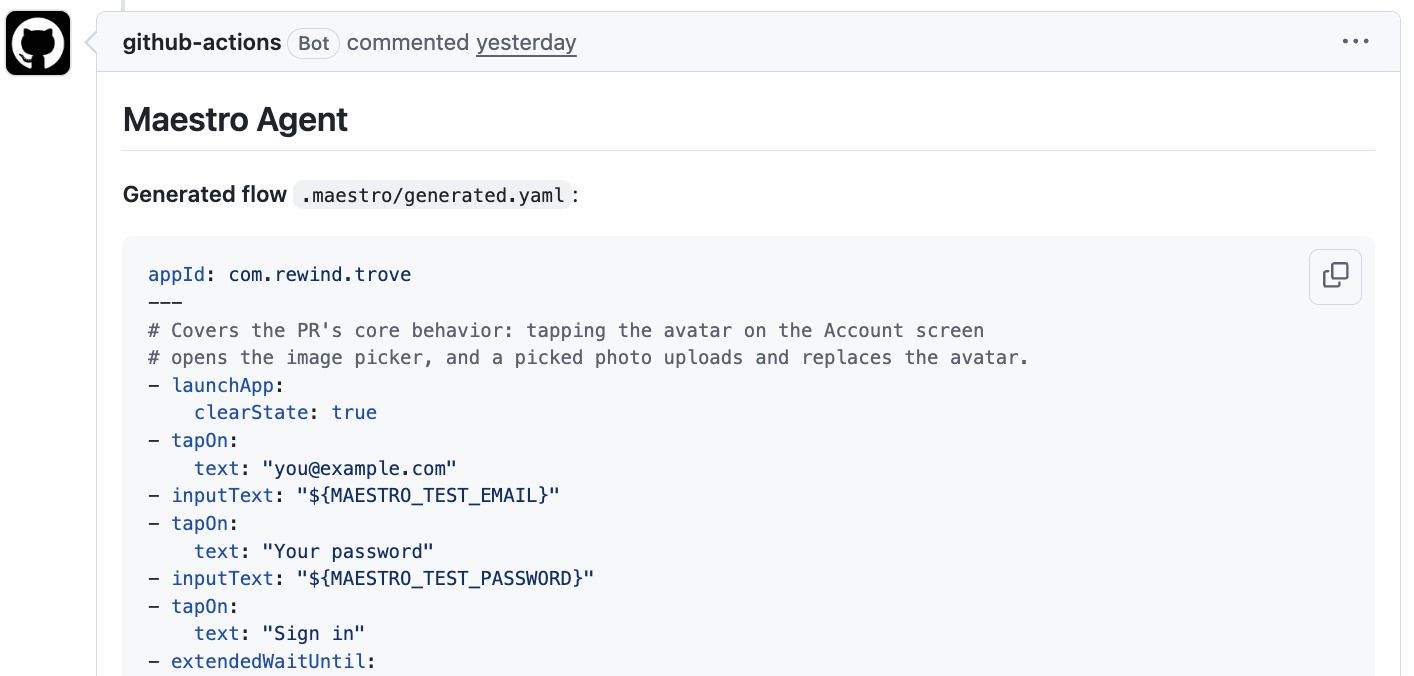
You never wrote the test suite. One assembled itself.
Feature? It tests the feature.
Fix? It tests the fix.
Regression?
Here's the part that matters.
The bug that comes back six months from now won't be in this diff.
It'll sneak in sideways, through code that looks unrelated.
That is why we commit the flow file back to the PR.
So when that PR is merged, any tests written for the feature, fix, or regression will be covered.
It gets added to our suite of tests, which run on Maestro Cloud.
We connect to Maestro Cloud via a GitHub Action, which runs the test suite on every commit to main.
Test runs on every commit to main? WTF.
So you own a lot of Bitcoin, right?

Mobile emulation is notoriously compute-heavy.
Standard CI providers charge steep multipliers for x86 and ARM emulators, meaning high-concurrency PR testing easily spirals into a $ 4,000-per-month bill.
Maestro Cloud eliminates this bottleneck by letting you rent a dedicated device node at a flat rate of $250 per month, rather than paying per minute or per test.
You pay one fixed fee and run as many test loops as your team can push.
More importantly, it completely eliminates the need for infrastructure maintenance. You don't have to write custom scripts to boot emulators, fix broken Docker runners, or manage separate device matrices across iOS, Android, and Web. Maestro Cloud manages the hardware and boot environment for you.
More time shipping code.
More time to swipe on Tinder.
Save your money, time and most importantly, your sanity.
Your… SANITY!
Please! Hold My Hand to the Promised Land
Time to build the thing.
There are eight steps.
Five of them create small files, two click around GitHub, and the last one is optional (that's the Maestro Cloud part).
By the end, you'll have a repo where every PR gets its own agent-written, device-validated UI test, committed back to the branch like it was always there.
Let's go.
Open your project.
We're going to create four files, add some secrets, and open a PR.
That's the whole journey, Frodo!
Step 1. Make a test user.
Create a throwaway account in your app's auth backend. The agent will log in as this user on every PR. Keep the email and password handy; they become secrets in Step 3.
If your app has no login, skip this step and delete the login parts of the brief in Step 5.
Your life is easier than ours.
Step 2. Get your agent a token.
The agent needs to authenticate in the CI somehow, and you have two options: an API key, which bills per token, or a token that rides a subscription you're already paying for.
We use Claude Code with the subscription route.
Run this locally:
claude setup-token
It prints a long-lived token tied to your Claude plan, so CI runs don't touch API credits.
On Cursor, the equivalent is a CURSOR_API_KEY from the dashboard, billed against your Cursor plan. Codex can sign in with your ChatGPT account or an OpenAI API key.
Your agent must be able to load MCP servers headless, in CI, with nobody around to click "approve". Claude Code does this via --mcp-config.
Step 3. Add your secrets.
In GitHub: Settings → Secrets and variables → Actions.
Add:
CLAUDE_CODE_OAUTH_TOKEN from step 2 MAESTRO_TEST_EMAIL test user's email MAESTRO_TEST_PASSWORD test user's password # .env to build the app EXPO_PUBLIC_SUPABASE_URL whatever YOUR app EXPO_PUBLIC_SUPABASE_ANON_KEY needs at build time
The last two are ours.
Yours are whatever EXPO_PUBLIC_* values your app reads.
Step 4. Tell the agent how to reach the device.
Create .github/mcp.json:
{ "mcpServers": { "maestro": { "command": "maestro", "args": ["mcp", "--no-viewer"] } } }
That's the whole MCP config.
Maestro ships the server; this points the agent at it.
Step 5. Write the brief.
Create .github/maestro-agent-prompt.md. This is the instruction the agent gets on every PR, and it's the part you'll actually tune over time.
Think of it as the job description for your new QA hire.
It tells the agent to read the PR title, description and diff, and find the single most important user-facing change. To log in with the test user before anything else. To explore the app through the Maestro MCP tools.
Copy ours, swap in your app ID, adjust the login instructions to match your auth flow, and delete anything that doesn't apply.
Step 6. Add the workflow.
This is where everything gets wired together.
We're not going to dump all 200 lines on you (the full file is in the repo).
First, the workflow needs permission to push and to check out your actual branch.
By default, pull_request workflows check out a detached merge commit that you can't push to, so both of these lines exist for the commit-back at the end:
permissions: contents: write pull-requests: write # in the checkout step: - uses: actions/checkout@v4 with: fetch-depth: 0 ref: ${{ github.head_ref }}
Second, we generate the context files the brief reads.
This is where pr-context.md, pr-diff.patch and flow-target.txt come from: the workflow writes them fresh from the PR event on every run. The last two lines derive the flow's filename from the branch name, which is what makes re-runs update the same flow.
- name: Gather PR context env: TITLE: ${{ github.event.pull_request.title }} BODY: ${{ github.event.pull_request.body }} BASE_REF: ${{ github.base_ref }} HEAD_REF: ${{ github.head_ref }} run: | { echo "# Title" echo "$TITLE" echo echo "# Description" echo "$BODY" } > pr-context.md git fetch --no-tags origin "$BASE_REF" git diff "origin/${BASE_REF}...HEAD" > pr-diff.patch SLUG=$(printf '%s' "$HEAD_REF" | sed 's#.*/##; s/[^A-Za-z0-9._-]/-/g') echo ".maestro/${SLUG}.yaml" > flow-target.txt
Third, the build.
The EXPO_PUBLIC_* values must be present at build time because Expo bakes them into the bundle; without them, the app builds successfully but crashes on launch in CI.
- name: Build release APK (x86_64) working-directory: android env: EXPO_PUBLIC_SUPABASE_URL: ${{ secrets.EXPO_PUBLIC_SUPABASE_URL }} EXPO_PUBLIC_SUPABASE_ANON_KEY: ${{ secrets.EXPO_PUBLIC_SUPABASE_ANON_KEY }} run: ./gradlew :app:assembleRelease -PreactNativeArchitectures=x86_64
If you're not on Expo, this step and the prebuild before it are the only parts you replace.
Fourth, we boot the emulator, install the app, hand the agent the brief, then run whatever it produced:
- name: Generate test, run uses: reactivecircus/android-emulator-runner@v2 env: CLAUDE_CODE_OAUTH_TOKEN: ${{ secrets.CLAUDE_CODE_OAUTH_TOKEN }} MAESTRO_TEST_EMAIL: ${{ secrets.MAESTRO_TEST_EMAIL }} MAESTRO_TEST_PASSWORD: ${{ secrets.MAESTRO_TEST_PASSWORD }} with: api-level: 34 arch: x86_64 profile: pixel_6 script: | mkdir -p .maestro maestro-results adb install -r android/app/build/outputs/apk/release/app-release.apk printf 'email: %s\npassword: %s\n' "$MAESTRO_TEST_EMAIL" "$MAESTRO_TEST_PASSWORD" > pr-credentials.md claude -p "$(cat .github/maestro-agent-prompt.md)" --mcp-config .github/mcp.json --allowedTools "mcp__maestro__list_devices,mcp__maestro__inspect_screen,mcp__maestro__take_screenshot,mcp__maestro__run,mcp__maestro__cheat_sheet,Write,Read" --dangerously-skip-permissions --max-turns 40 < /dev/null | tee agent-output.txt maestro test .maestro --format junit --output maestro-results/report.xml -e MAESTRO_TEST_EMAIL="$MAESTRO_TEST_EMAIL" -e MAESTRO_TEST_PASSWORD="$MAESTRO_TEST_PASSWORD" 2>&1 | tee maestro-results/run.log || true
Swap the claude line for your agent of choice.
Last, the flow gets committed back to the PR branch.
The [skip ci] is what stops the push from triggering this same workflow again, forever.
- name: Commit generated flow to the PR if: always() env: HEAD_REF: ${{ github.head_ref }} run: | TARGET=$(cat flow-target.txt) git add "$TARGET" git config user.name "github-actions[bot]" git config user.email "41898282+github-actions[bot]@users.noreply.github.com" git commit -m "test(maestro): update generated flow [skip ci]" git push origin "HEAD:${HEAD_REF}"
Step 7. Open a PR.
Open a PR with a user-facing change.
Then go watch the Actions tab.
The emulator boots, the agent logs into your app, pokes at the actual screens, writes a flow, runs it until it's green, and pushes .maestro/your-branch-name.yaml back onto your branch with the result commented on the PR.
That file merging to main is how your suite builds itself. One validated flow per feature, forever.
Step 8 (optional). Run the suite on Maestro Cloud.
When you want every merge to main to run the whole accumulated suite on real infrastructure: create a Maestro Cloud account, grab the API key and project id from the dashboard, add them as MAESTRO_API_KEY and MAESTRO_PROJECT_ID secrets, and copy .github/workflows/maestro-cloud.yml from our repo. It builds a universal APK (all ABIs this time, cloud devices are not x86 emulators) and ships it plus .maestro/ off to Maestro Cloud on every push to main.
That's it.
Two workflows,
One brief.
A handful of secrets, and no test file you'll ever write by hand.
You can see the workflow working in our application “Trove” here:
👉 Trove