
(I can fix that - Holes 2003)
Grab it While it’s Hot
If you’ve been using tools like Cursor, Claude Code, or Copilot to help build your app… don’t lie… we know you have (cough cough, prompt engineer).
You may relate to this struggle.
You spend half your day trying to explain to the AI exactly which component you’re looking at. "No, not that button, the one inside the nested View in the header..."
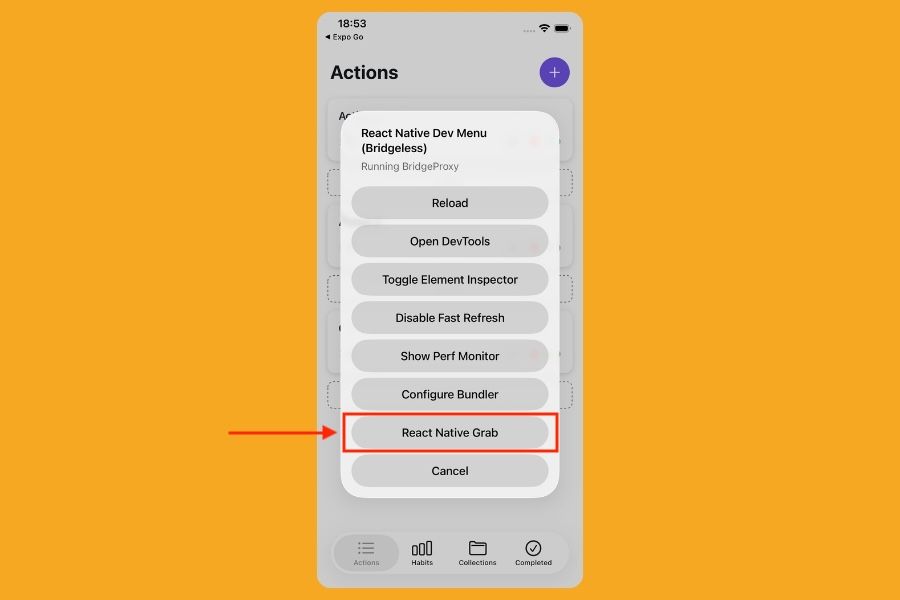
React Native Grab is here to solve this. Inspired by the web-based React Grab, this is a touch-to-grab context tool that lets you point at a real native element on your screen and instantly capture its precise source context.
It wires into your Metro configuration and sends the file location, component name, and metadata straight to your clipboard.
You just tap the UI, paste the context into your AI agent, and tell it to fix the alignment—no more playing detective in your own codebase or "describing layouts" like you’re writing a Victorian novel.
// metro.config.js const { getDefaultConfig } = require("@react-native/metro-config"); const { withReactNativeGrab } = require("react-native-grab/metro"); const config = getDefaultConfig(__dirname); module.exports = withReactNativeGrab(config);
There is a significant catch, though: this is a New Architecture-only affair. It relies heavily on Fabric’s native view hierarchy and APIs, so if you’re still clinging to the legacy bridge like a safety blanket, you’re out of luck.
Setup also involves wrapping your root —plus your individual screens if you’re using native navigators.
// app root import { ReactNativeGrabRoot, ReactNativeGrabScreen } from "react-native-grab"; // When using native navigators (native stack, native tabs), wrap each screen: function HomeScreen() { return <ReactNativeGrabScreen>{/* screen content */}</ReactNativeGrabScreen>; } export default function AppLayout() { return <ReactNativeGrabRoot>{/* app/navigation tree */}</ReactNativeGrabRoot>; }
Once it's wired up, you just trigger it from the Dev Menu and start selecting.
It’s a specialised tool for the vibe code era, designed to kill the "search and describe" phase for those low-entropy UI changes like spacing, copy updates, and alignment tweaks.

(Be Ridiculously Good Looking - Zoolander 2002)
The Fossil is Twitching
For years, AsyncStorage has been the "old reliable" of the ecosystem. We all assumed the maintainers had essentially thrown the keys into a lake and walked away, leaving us with a singleton (a design pattern that ensures a class has only one instance and provides a global point of access to it) that hasn't changed since the days we were all obsessed with Flappy Bird.
Well, surprise.
AsyncStorage v3.0 has finally arrived, and the biggest shocker is that it’s no longer a global singleton. You can now create isolated storage instances, meaning you can finally stop shoving your sensitive user auth tokens and your "is-first-time-user" flags into the same overflowing junk drawer.
import { createAsyncStorage } from "@react-native-async-storage/async-storage"; // Dedicated instances? In this economy? const authStorage = createAsyncStorage("auth"); const settingStorage = createAsyncStorage("settings");
To prevent a total community meltdown, the default export still points to the v2 "legacy" bucket, so your existing data won't just vanish into the void.
// Still works (uses the v2 backend) import AsyncStorage from "@react-native-async-storage/async-storage";
You can migrate to the new instance-based world at your own pace, or just keep using the default export while pretending you’re still in 2019.
The "Multi" methods — which previously required you to pass arrays of arrays like some kind of weird 2D matrix hazing ritual — have been renamed to getMany, setMany, and removeMany. They now use clean, modern Objects.
// Out with the [["key", "val"]] arrays, in with the Records const data = await authStorage.getMany(["token", "expiry"]); // Returns: { token: "abc", expiry: "123" }
A quick heads-up for the Android crowd: you’ll need to add a local Maven repository to your build.gradle to get v3 running. So there you go, for those who keep saying this newsletter is too iOS-centric.
allprojects { repositories { // ... others like google(), mavenCentral() maven { url = uri(project(":react-native-async-storage_async-storage").file("local_repo")) // or uri("path/to/node_modules/@react-native-async-storage/async-storage/android/local_repo") } } }
So, if you had "AsyncStorage Major Update" on your bingo card for this year, congratulations —you’re as surprised as we are.

Ah, Push it Good, Push it Real Good
There are few things in this life more tedious than testing push notifications. Usually, the process involves hunting down a device token hidden in a console log, finding a CLI tool you haven't updated in six months, and manually typing out a JSON payload while praying you didn't miss a comma.
It’s the kind of high-friction workflow that makes you want to quit tech and become a professional bread-taster, because it would be less bland…
Beto (@betomoedano) decided to build QuickPush, a lightweight macOS menu bar utility that lets you test Expo push notifications without ever touching the terminal. It’s designed for those moments when you just need to iterate on notification copy or check how a specific data payload behaves on a real device without the "context-switching tax" of opening a browser or a terminal.
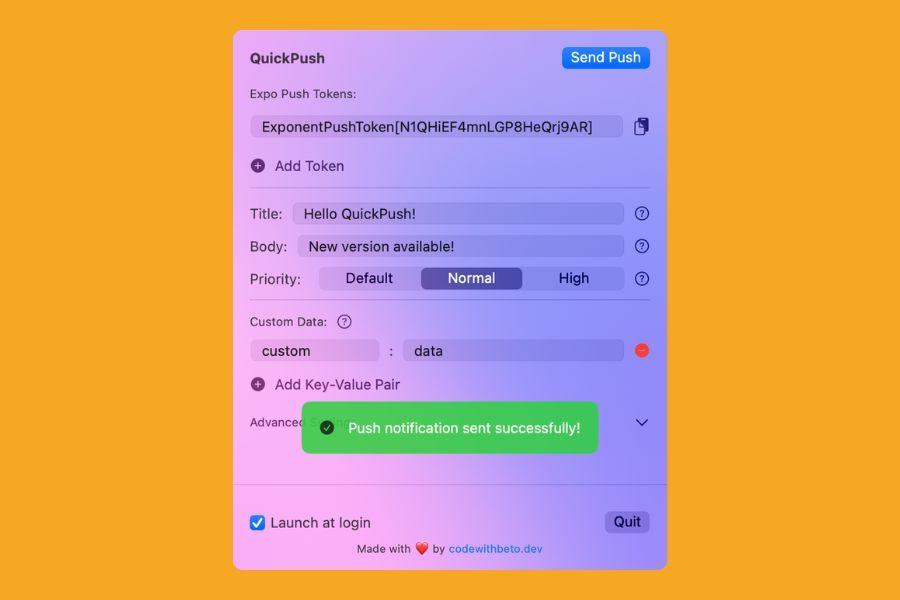
The app is dead simple: you paste in your Expo push token, tweak the title and body, and hit send. It handles the platform-aware nuances for iOS and Android under the hood, and even lets you add custom data fields if you’re testing deep links or specific app behaviours.
This is a paid extension if you want to download it directly from the store, but it’s open source, so you can actually build it directly from source to get it for free.
git clone https://github.com/betomoedano/quick-push.git open quick-push/QuickPush.xcodeproj
While it’s a GUI tool, the underlying logic is still the same Expo payload we know and love. Instead of wrangling a curl command, you're looking at a focused interface that keeps your recent sends ready for quick iteration.
// What you'd normally have to wrap in a curl command { "to": "ExponPushToken[xxxxxxxxxxxxxxxxxxxxxx]", "title": "Order Update", "body": "Your pizza is 5 minutes away!", "data": { "orderId": "12345", "type": "delivery" }, "priority": "high" }
So, if you’re tired of the "send, wait, fail, repeat" cycle of notification testing, QuickPush is a solid addition to your menu bar. It’s one of those small utilities that doesn't try to change your life — it just wants to save you three minutes of frustration.
So now, you can push it, push it real good.